New VA Setup Checklist
Step-by-step checklist for setting up your Virtual Airline from scratch — work through each day in order.
This checklist walks you through setting up your Virtual Airline from scratch. Work through each day in order — each step explains what you are doing and why, with a link to the full documentation if you need more detail.
Work at Your Own Pace
You do not need to complete everything in one sitting. Take each day at your own pace — the trial lasts 14 days. The daily labels are there to keep things manageable, not to pressure you.
Day 1 — Settings & Identity
Your first visit and getting Orwell configured.
Your first visit
When you first log into your Virtual Airline on vAMSYS, you will land in Phoenix — the pilot portal. A popup will appear asking you to select your starting location:
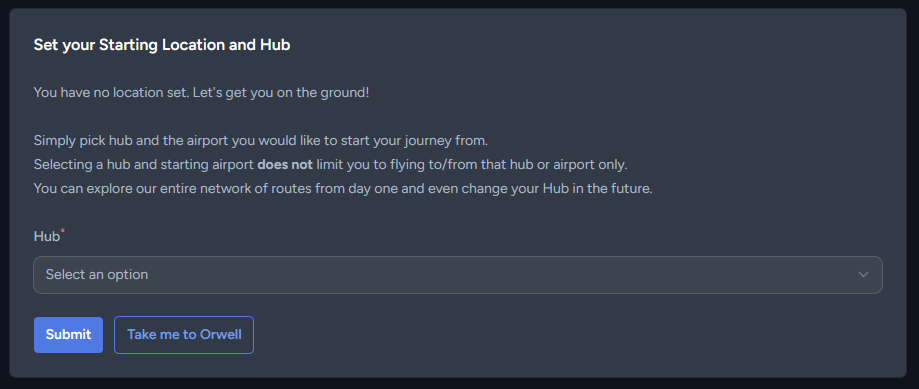
This is the same prompt every pilot will see when they join your Virtual Airline — it asks them to choose a hub and starting airport. We have not set up hubs yet, so do not worry about this for now. Click the Take me to Orwell button to go straight to the management backend where we will do all the setup work.
Getting to know Orwell
Orwell is where all VA management and day-to-day operations take place. The first time you open it, it looks empty — just a dashboard with a few menu items. Before adding airports and aircraft, we need to lay the groundwork: permissions, callsigns, settings, and branding. This is the step most VA owners skip and regret later. Taking the time now saves you trouble down the line.
Take note of your VA Identifier shown in the Virtual Airline Information panel on the dashboard (and in the top-right corner). This is your unique identifier — you will need it whenever you contact vAMSYS support.
1. Enable your staff permissions
Your Orwell navigation menu starts with just a few items — that is by design. As a VA Owner, you always have access to Staff and Billing, but everything else is controlled by permissions. Navigate to HQ → Staff, click on your own entry, and toggle all permissions on. Click Save changes at the bottom, then reload the page. Your navigation menu will expand to reveal all of Orwell.
While you are on the Staff page, fill in your title (Owner, Director, CEO — whatever you prefer), optionally upload a staff avatar, and set a staff email if you want it shown publicly on your Team Page.
Full guide: Staff
2. Set up callsign parameters
Back on the Orwell dashboard, you will see a red warning banner. This appears because your callsign parameters are not fully configured yet. Navigate to HQ → Settings → Callsign Parameters and click the edit button on your primary callsign. You need to set the ATC Radio Callsign and Operator — the helper text on the page explains what each field means.
If your Virtual Airline operates under multiple callsigns (for example, the way Wizz Air uses both WZZ and WUK), you can add additional callsign parameters here.
Full guide: Callsign Parameters
3. Configure general settings
Go to HQ → Settings → Basic Settings. The most important setting here is Timezone — it determines when statistics roll over, when activity checks happen, and when scheduled events trigger. Set it to your primary timezone, not UTC (unless that is your primary timezone). Also fill in your slogan, website, and pilot support URL. The Pilot Support Email is mandatory — it is used as the reply-to address for all emails vAMSYS sends to your pilots, including the registration and activity emails you will configure later in this guide.
Full guide: General Settings
Choose Your Timezone Carefully
Your timezone controls when statistics reset each day, when activity requirements are checked, and when leaderboard rankings update. Changing it after launch shifts all of these at once — pick the right one now.
4. Review vAMSYS modules
Navigate to HQ → Settings → vAMSYS Modules. This is where you enable or disable major vAMSYS features. Here is what each one does:
Activities — events, tours, and challenges that give pilots goals to fly towards
NOTAMs — important notices pilots must read and acknowledge before they can fly
Claims System — lets pilots submit manual flight reports when ACARS tracking fails
Route Changelist — shows pilots upcoming and ending routes so they can plan ahead
Marketing — adds an email opt-in banner so pilots can subscribe to your announcements
Leaderboards — ranks pilots by performance (global, per-hub, or per-network)
Badges — achievement awards for milestones like "100 Flights" or "Transatlantic Explorer"
Hangar — a file library where you upload documents and downloads for your pilots
You do not need all of them right away. Enable what makes sense for your VA now and add more later — every module can be turned on or off at any time.
5. Configure pilot registration
Navigate to HQ → Settings → Pilot Registration. The most important setting here is the Login/Register Link Modifier — this creates your unique registration URL (for example, vamsys.io/register/your-modifier). Choose something memorable for your VA.
Also decide whether to enable Registration Review. When enabled, new pilot applications require manual approval by your staff before the account is activated. This is useful if you want to vet new members.
Full guide: Pilot Registration
6. Set up registration emails
In HQ → Settings → Registration Emails, configure the email templates that pilots receive when they register. If you do not configure these, no emails will be sent — pilots will still be able to register, but they will not receive a welcome message.
If you enabled Registration Review, you will also see templates for the "registration received" and "registration rejected" emails. Take the time to write thoughtful templates — this is your first communication with new pilots.
Full guide: Pilot Registration
7. Set up branding
Navigate to HQ → Settings → Logo Settings to upload your logos. You need four variants: a bright and dark background version for Phoenix, and a bright and dark background version for the VA selection page, Orwell, Pegasus, and emails. All are recommended at 1800 x 400 pixels. Then visit Style Settings to configure your VA colours for light and dark mode. If you have social media accounts, head to Social Icons (also in Settings, under the Design group) to add links that appear on your Phoenix dashboard and community menu.
Full guide: Branding
8. Invite your team
If you are not working solo, now is a good time to invite your team. Since pilot registration is disabled during the trial, use HQ → Pilot Invites to bring them in. Invites are not sent immediately — there is a 20-minute grace period before they are processed, giving you time to revoke an invite if you made a mistake. Invites are executed in the order they were created, so usernames are assigned sequentially (for example, XXX0002, XXX0003, XXX0004). If username order matters to you, create invites one at a time and wait for each to be processed before creating the next.
Once they have joined, navigate to HQ → Staff, click New Staff, and assign them appropriate permissions. Be thoughtful about which permissions each staff member needs — not everyone needs access to everything.
Flight Settings
You may notice other settings pages under the Flight group — Booking & Dispatch, Reward Settings, PIREP Settings, ACARS Sounds, and SimBrief Integration. Do not worry about these yet — they will make much more sense after you have set up fleets and routes. We cover the essential ones in Days 3 and 4. ACARS Sounds (custom cabin audio for Pegasus flight phases) and SimBrief Integration (OFP format preferences) work well at their defaults and can be explored after launch.
Day 2 — Infrastructure
Airports, fleet, and aircraft — the building blocks of your route network.
Today we create the physical infrastructure your pilots will fly between and the equipment they will fly. In vAMSYS, a fleet type is an aircraft model — like Boeing 737-800 or Airbus A320neo. An aircraft is an individual registration within that fleet — like G-ABCD. You create the model first (with capacities, images, and scoring group), then add tail numbers to it. Aircraft inherit their fleet's settings but can override them individually. Order matters here: airports come first because routes connect airports, and fleet types come before individual aircraft.
1. Create airports
Your pilots need somewhere to fly. Navigate to Operations → Airports → Airports and start adding airports. Each airport requires a Name and an Airport Code (ICAO or IATA, 3–4 characters). For now, focus on getting your core network created — just the name and code is enough to get started.
You will notice additional tabs on each airport: Taxi Times (override default taxi durations for scoring), Managers (assign staff who can edit routes from this airport), Alternate Management (configure SimBrief alternate airport search and fixed alternates), and Load Management (override passenger and cargo load factors per airport). These are all optional and can be configured at any time — come back to them once your VA is up and running and you want to fine-tune the pilot experience.
Full guide: Airports
2. Set up hubs
Hubs are the starting locations new pilots choose when they join your VA. Navigate to Operations → Airports → Hubs and create at least one hub. Hubs also group airports into regions and can enable hub-based leaderboards — useful for larger VAs with multiple bases of operation.
Full guide: Hubs
3. Add scenery recommendations (optional)
If you want to recommend simulator scenery add-ons for your airports, you can do that at Operations → Airports → Scenery. This is entirely optional and can be done at any time.
Full guide: Scenery
4. Create fleet types
Navigate to Operations → Fleet → Fleet and create your fleet types. Each one defines passenger and cargo capacities, the SimBrief aircraft type (SimBrief is a free flight planning tool that generates fuel loads and route plans — pilots access it by linking their Navigraph account), and default images. Create all your fleet types now — you will need them before setting up scoring groups and routes.
Full guide: Fleet
5. Add individual aircraft
Each fleet type contains individual aircraft registrations — for example, G-ABCD within your Boeing 737-800 fleet. Navigate to Operations → Fleet → Aircraft to add them. Aircraft inherit most settings from their fleet type but can override things like capacity, images, and SimBrief configuration individually.
Full guide: Aircraft
6. Configure containers (optional)
If your VA operates cargo flights with container-based loading (ULDs), set up container types at Operations → Payload → Containers. Most VAs can skip this step.
Full guide: Containers
7. Configure load factors (optional)
Load factors control how passenger and cargo loads are calculated for flights. You can find them at Operations → Payload → Load Factors. The defaults work well for most VAs — you can fine-tune these later if needed.
Full guide: Load Factors
Bulk Import
If you have many airports, fleet types, or aircraft to add, check the import/export tools — they let you create entries in bulk from spreadsheets instead of adding them one by one.
Full guide: Import/Export Best Practices
Day 3 — Rewards & Scoring
How pilots earn ranks, badges, and points.
Now that your fleet types exist, we can configure how vAMSYS evaluates and rewards flights. After each flight, pilots submit a PIREP (Pilot Report) — a detailed flight log recording flight time, landing rate, fuel usage, and route flown. Your scoring rules evaluate each PIREP and award points accordingly. This is where you define what "good flying" means for your VA — and it is entirely up to you. Some VAs score strictly, others are relaxed. There is no wrong approach.
1. Create ranks
Ranks are the progression system for your pilots — think Cadet, First Officer, Captain, and so on. Navigate to HQ → Rewards → Ranks. Two default ranks exist (Cadet and Staff Team) and cannot be deleted. You decide what triggers promotion: flight hours, points, flight count, or a combination. Regular ranks are awarded automatically when thresholds are met. You can also create honorary ranks that staff award manually — useful for recognition or special roles.
Full guide: Ranks
2. Create badges (optional)
Badges reward specific achievements — for example, "100 Flights", "Night Owl", or "Transatlantic Explorer". They can be awarded automatically when pilots hit milestones or manually by staff. Navigate to HQ → Rewards → Badges to create them. This is optional — you can always add badges later.
Full guide: Badges
3. Set up scoring groups
Scoring groups bundle scoring rules together and assign them to fleet types. When a PIREP is processed, vAMSYS looks up the scoring group for that flight's fleet type and applies its rules. Navigate to HQ → Rewards → Scoring Groups to create them. You might have one group for all aircraft, or different groups for different fleet types.
Full guide: Scoring Groups
4. Configure scoring rules
Scoring rules are the individual criteria within a scoring group: landing rate thresholds, engine management checks, fuel efficiency, and dozens more. Each rule awards or deducts points from the PIREP. Navigate to a scoring group and add rules within it.
Full guide: Scoring Rules
5. Set up AutoReject rules (optional)
AutoReject rules automatically flag, reject, or invalidate PIREPs that do not meet certain criteria — for example, a landing rate worse than -500 fpm. Navigate to HQ → Rewards → AutoReject Rules to configure them. We recommend starting with just a few lenient rules and tightening them as you learn what works for your VA.
Full guide: AutoReject Rules
6. Review reward and PIREP settings
Go to HQ → Settings → Reward Settings and HQ → Settings → PIREP Settings (both under the Flight group). Reward Settings controls how flight time is calculated (whether taxi time counts, which route types award hours and points) and airport manager bonuses. PIREP Settings controls the appeals process for rejected PIREPs and what happens when a pilot diverts to the wrong airport. The defaults are sensible for most VAs — review them now and adjust after your first test flight.
Full guide: PIREP & Reward Settings
Scoring Is Not Permanent
You do not need to get scoring perfect right now. You can adjust rules, groups, and AutoReject criteria at any time — changes only affect future PIREPs, not past ones.
Day 4 — Routes & Content
Build your route network and the pages your pilots will see.
With infrastructure and scoring in place, it is time to build what pilots actually interact with: routes to fly and pages to read.
1. Configure route creation defaults
Before creating any routes, go to HQ → Settings → Route Creation Defaults. These settings control how callsigns behave on all routes you create from this point forward — they are not applied to existing routes, so it is important to set them now. You can choose whether route times use local airport timezones or UTC, whether pilots can change their callsign during dispatch, and how callsigns are auto-generated (from the pilot's username, name, aircraft registration, or a custom pattern).
Full guide: Routes
2. Create routes
Routes are the core of your VA's operations — each one defines a departure airport, arrival airport, which fleets can fly it, the callsign to use, and the schedule. Navigate to Operations → Routes → Routes to create them. Start with a handful of routes covering your main network and expand later. You do not need every route on day one.
Full guide: Routes
3. Add routings (optional)
Routings are pre-defined flight plan waypoint strings for airport pairs. If you add routings, all routes between the same two airports share the same waypoint data — making AIRAC updates much easier. Navigate to Operations → Routes → Routings. This is optional and can be added at any time.
Full guide: Routings
4. Configure booking & dispatch settings
Go to HQ → Settings → Booking & Dispatch. The most important setting here is the jumpseat system — it lets pilots change their location to a different airport without flying. You can limit it to airports connected by routes, extend it to hub airports, or allow jumping to any airport in your network. Also configure booking validity (how long a booking lasts before expiring), dispatch table columns, and external flight tracking buttons (FlightAware, Flightradar24). These settings shape how pilots experience flight booking.
Full guide: Booking & Dispatch Settings
5. Restore the Pegasus ACARS page
Your pilots need somewhere to download the Pegasus flight tracker. Navigate to HQ → Pages → Custom Pages and click the three-dot menu next to the New Custom Page button. Select Restore ACARS Page. This creates a pre-built page with Pegasus download links and setup instructions for your pilots.
Full guide: Custom Pages
6. Build custom pages
Still in HQ → Pages → Custom Pages, consider creating an "About Us" page and a "Rules" page. If you create a rules page, go back to HQ → Settings → Pilot Registration and assign it as your Rules Page — this displays the rules during registration so pilots must read and agree to them before joining. The page builder supports text, images, alerts, buttons, and YouTube videos — you have plenty of flexibility.
Full guide: Custom Pages
7. Design the Phoenix dashboard
The dashboard is the first thing pilots see when they log into Phoenix. Navigate to HQ → Pages → Phoenix Dashboard Editor to arrange it. You can add statistics, recent activity, social links, flight maps, and more. This is your chance to make the first impression count.
Full guide: Phoenix Dashboard Editor
8. Create presets (optional)
Presets are reusable text and point macros for PIREP review comments, point adjustments, and registration review responses. If you plan to do manual PIREP reviews, presets save a lot of time. Navigate to HQ → Settings → Presets to create them.
Full guide: Presets
Day 5 — Engagement & Communication
Activities, alerts, and keeping your pilots informed.
Your VA is nearly ready. Before opening for business, set up the tools you will use to communicate with pilots and keep them engaged.
1. Create a launch activity (recommended)
Activities are events, tours, rosters, or challenges that give pilots something to fly towards — with bonus points, badges, and progress tracking. A launch-week activity is a great way to build excitement when your VA opens to the public. Navigate to Operations → Activities to create one.
Full guide: Activities
2. Set up activity requirements (optional)
If you want to enforce minimum flying activity — for example, one flight per month — configure it at HQ → Settings → Activity Settings. You might want to hold off on this until your VA has a few active pilots — enforcing activity requirements on an empty VA does not make much sense. If you do enable them, you can also define Airline Holidays at Operations → Airline Holidays — these are airline-wide days off (like Christmas or a seasonal break) when activity requirements are paused for all pilots.
Full guide: Activity Requirements
3. Write a welcome alert or NOTAM
Alerts are short messages displayed to pilots in Phoenix and Pegasus — useful for quick announcements. NOTAMs are longer notices that pilots must read and acknowledge before they can fly — useful for important policy updates. Consider writing a welcome message for your launch.
4. Configure activity emails
If you enabled activity requirements, navigate to HQ → Settings → Activity Emails to set up the warning and removal email templates. Like registration emails, if you do not configure these, no emails will be sent to pilots.
Full guide: Activity Requirements
Trial Reminder
Public registration is disabled during the trial — only Pilot Invites work. Once you start your subscription, the public registration page goes live.
Day 6 — Test Flight & Launch
Validate everything, then open your doors.
Everything is configured. Before starting your subscription and opening registration, do a full test run to make sure the pilot experience works as you intend.
1. Switch to Phoenix
Click Phoenix in the Orwell navigation. This is what your pilots will see. Check the dashboard layout, browse your custom pages, and look at the community section. Does everything look right? Does it feel like your VA?
2. Book a flight
Go to Flight Centre → Book Flight and select one of your routes. Walk through the entire booking flow — departure, arrival, fleet selection, dispatch page. Experience it as a pilot would. Check that the dispatch information, SimBrief integration, and flight details all appear correctly.
3. Download Pegasus and fly
In Phoenix, open the Pegasus ACARS page (under Resources, if using the default page layout) and download the Pegasus client. Complete your test flight from start to finish. This is the best way to verify that your scoring rules work as expected, SimBrief dispatches correctly, and any ACARS sounds you configured play at the right moments.
4. Review the PIREP
Back in Orwell, navigate to Flight Centre → PIREPs. Your test flight should appear here. Open it and review the scoring breakdown — check how many points were awarded or deducted, whether any AutoReject rules fired, and whether the flight hours and distance look correct. This is your opportunity to fine-tune scoring before real pilots start flying.
Full guide: PIREPs
5. Check bookings and liveries
Verify that your booking appeared correctly in Flight Centre → Bookings and that any aircraft livery was detected during the flight in Flight Centre → Liveries.
Full guides: Bookings, Liveries
6. Review pilot onboarding settings
Before going live, review the settings that shape a pilot's first experience with your VA:
Registration emails — check that your welcome email and any registration review emails are configured and read well
Registration review — if enabled, incoming applications appear at Pilots → Registrations for manual approval. Make sure you and your staff understand the review flow before launch
Ranks — verify your rank structure, promotion thresholds, and starting rank are correct
Activity requirements — if enabled, confirm the thresholds are reasonable for a new VA
Activity emails — if activity requirements are on, check that warning and removal emails are configured
To see the registration flow in action, invite a staff member or friend who does not yet have a vAMSYS account via HQ → Pilot Invites. They will go through the full registration process and can give you real feedback on the experience.
Do Not Create Test Accounts
Do not register a second account to test the flow yourself — having multiple accounts violates the vAMSYS Terms of Service. Instead, invite someone who does not already have an account. They will experience the exact same registration flow and can report back.
7. Start your subscription
When you are satisfied that everything works, navigate to HQ → Billing and start your subscription. Starting your subscription ends the trial immediately — make sure you are ready before proceeding. Once active, your registration page goes live and pilots can join your Virtual Airline.
Full guide: Billing
Trial Expiry
If your trial expires without an active subscription, your Virtual Airline is deleted. Make sure to start your subscription before the 14-day trial ends.
After Launch
Your VA is live — congratulations! As your airline grows, there are additional features to explore:
Rank Transfer — let experienced pilots from other VAs skip to a higher starting rank
Pilot Sharing Agreements — share pilots between allied VAs
Holidays — let pilots request time off from activity requirements
ACARS Sounds — custom VA sounds for Pegasus flight phases
Statistics — VA-wide analytics dashboard
Import/Export Best Practices — bulk data management as your VA grows
Discord Integration — connect your Discord server for automatic alerts, NOTAM posts, badge awards, and PIREP notifications
Webhooks & API — integrate vAMSYS with external tools or your own website
Related
Getting Started with vAMSYS — overview and trial information
Billing — subscription management
Thank you for your feedback!
Your input helps us improve our documentation.